How to Group and Ungroup Rows in Excel
In this article, you will be introduced to a simple method to collapse multiple rows and expand grouped rows in excel.
Why do you need to collapse rows in Excel?
Grouping rows in Excel can be helpful for several reasons:
Summarizing data: Grouping rows allows you to quickly summarize data by collapsing multiple rows into a single row. This can be especially useful when dealing with large datasets, making it easier to get a quick overview of the information in the Excel sheet.
Organize data: Sometimes you may have a lot of detailed information in your spreadsheet that you don't need to see all the time. Grouping rows lets you hide the details temporarily, allowing you to focus on the higher-level information.
Overall, grouping rows in Excel can help you manage and analyze your data more efficiently, and it can make it easier to work with large and complex Excel workbooks.
How to quickly group rows in Excel?
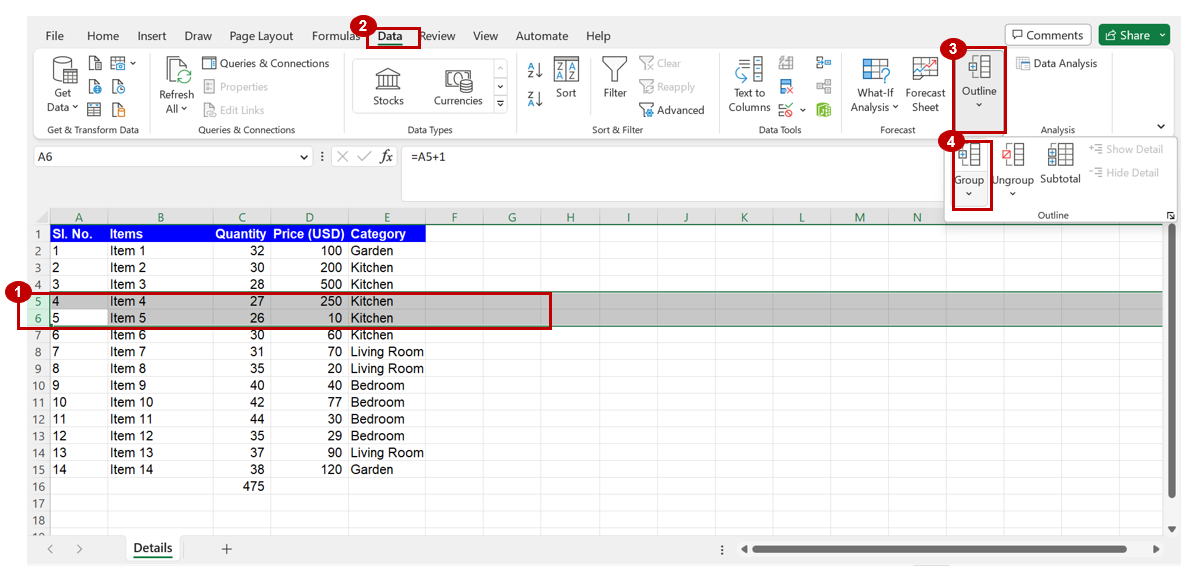
Step 1: Select the rows that you wish to group. Learn how to easily select multiple adjacent rows in Excel here: How to Select Multiple Rows in Excel
Step 2: Select the ‘Data’ ribbon on the Excel toolbar
Step 3: Click on the ‘Outline’ tab and select the ‘Group’ option
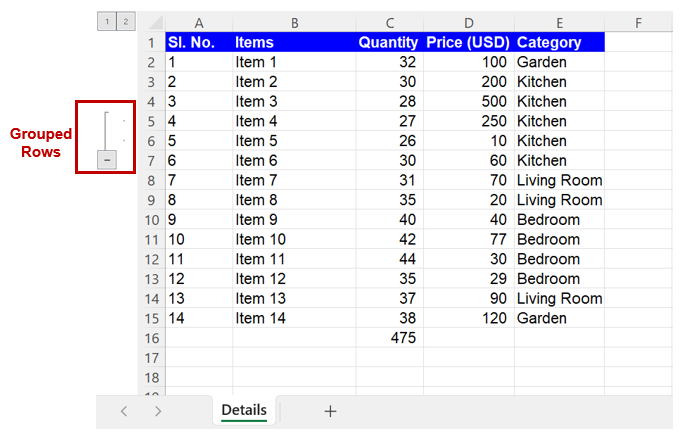
The rows selected in step 1 will be grouped as shown below.
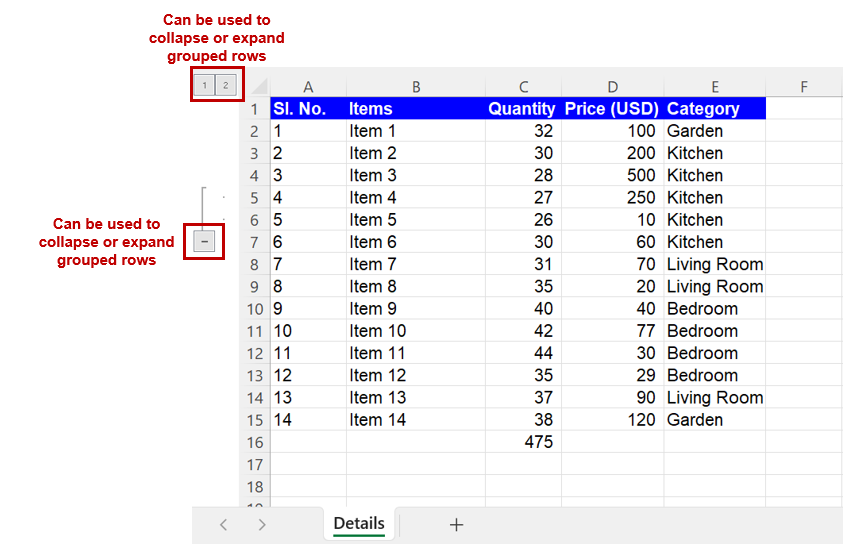
The “-” sign and “+” sign will help you collapse and expand the grouped rows. Alternatively, the “1” and “2” signs on the top of the row header section can also be used to collapse and expand the grouped rows.
Note: The above steps can also be performed using keyboard shortcuts on Windows as follows:
Step 1: Select the rows that you wish to group. Learn how to easily select multiple adjacent rows in Excel here: How to Select Multiple Rows in Excel
Step 2: Press on the “ALT” + “A” + “G” + “G” keys. Alternatively, you can press and hold the “SHIFT” + “ALT” + “Right Arrow” keys.
The rows selected in step 1 will be grouped.
How to quickly ungroup rows in Excel?
Step 1: Select the grouped rows that you wish to expand. Learn how to easily select multiple adjacent rows in Excel here: How to Select Multiple Rows in Excel
Step 2: Select the ‘Data’ ribbon on the Excel toolbar
Step 3: Click on the ‘Outline’ tab and select the ‘Ungroup’ option as shown below
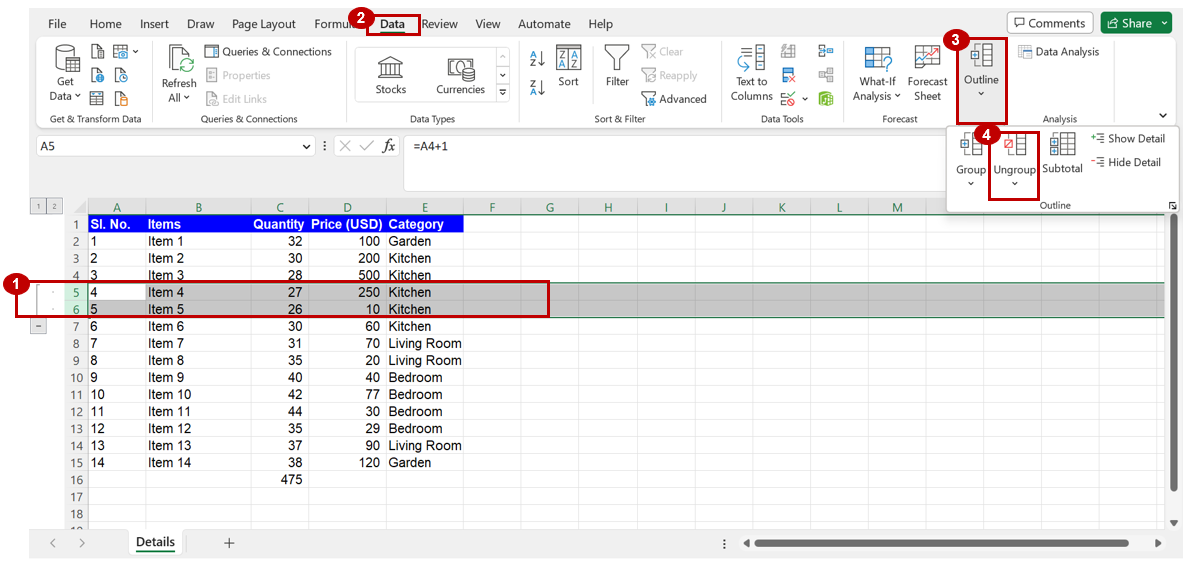
The rows selected in step 1 will be ungrouped.
Note: The above steps can also be performed using keyboard shortcuts on Windows as follows:
Step 1: Select the grouped rows that you wish to ungroup. Learn how to easily select multiple adjacent rows in Excel here: How to Select Multiple Rows in Excel
Step 2: Press on the “ALT” + “A” + “ZO” + “U” + “U” keys. Alternatively, you can press and hold the “SHIFT” + “ALT” + “Left Arrow” keys.
The rows selected in step 1 will be ungrouped.
Analyze your live financial data in a snap in Google Sheets
Are you learning this formula to visualize financial data, build a financial model, or conduct financial analysis? In that case, LiveFlow may help you automate manual workflows, update numbers in real-time, and save time. You can access various financial templates on our website, from the simple Income Statement to Multi-Currency Consolidated Financial Statement. Are you interested in this product but are an Excel user? That’s not a problem at all. You can connect Google Sheets to Excel quickly.
To learn more about LiveFlow, book a demo.

You can learn about other Excel and Google Sheets formulas and tips that are not mentioned here on this page: LiveFlow‘s How to Guides

